Showing posts with label Instructions. Show all posts

Tuesday, January 8, 2008

Posting your custom banner on Typepad

This is not meant to be a comprehensive instruction guide, but I hope this brief tutorial is a help. If you have questions, please email me (using the link on the left/top) or leave it as a comment on this post.

Log in to your Typepad account. You'll see your welcome screen and the name of your blog. Click on either the name of your blog.

From the tabs at the top, click on the Design tab.


Then choose the Change Theme option.

You want to set your theme to "Custom Theme" (rather than "Pre-Defined") on the next page.

The second option down is Page Banner. Click the "Edit this Element" button. This opens a new window with Style Options.

Click the box next to the text that reads "use this banner image instead of a text title. Use the browse button to navigate to your banner image as you have saved it on your computer.
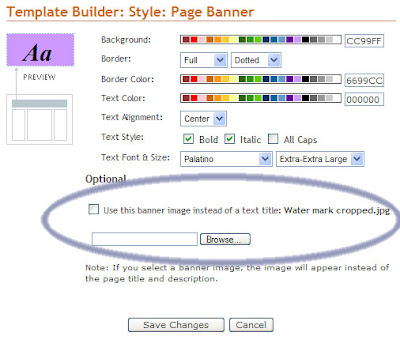
Click the "Save Changes" button. This will take you back to the "Customize Your Theme" page with all your options for editing your template.

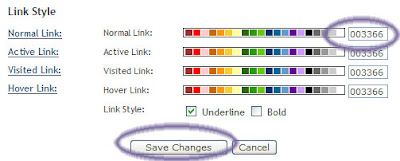
On the "General Page Settings" page you can choose different colors for your page elements
  • General Settings:
  • Background color
  • Border location and style
  • Border color
  • Left Column width
  • Background color
  • Border location and style
  • Border color
  • Main Content Column width
  • Background color
  • Border location and style
  • Border color
  • Right Column width
  • Background color
  • Border location and style
  • Border color
  • Link colors
from either a preselected pallette by clicking on any of the boxes in the rainbow spectrum, or you can enter a 6-digit/6-letter hex code which is a web color code that can be customized to match your banner. If you know your hex code(s), enter it in the box next to the element that you want to use that color on. Enter the codes for each element that you want to adjust and then click the "Save Changes" button.


Any time you click the "Save Changes" button it will close the color pallette box and you can choose to then preview your blog's new look by clicking the "Preview" button at the bottom of the "Customize Your Theme" page. Once you like the new color scheme, click the "Save Changes" button at the bottom of the "Customize Your Theme" page and your new theme/colors will be published and go live.

Tuesday, December 18, 2007

Changing your colors to match your banner on Blogger

If you really want to customize your blog, try changing your colors to match! For complete customization, you'll need to know your hex color codes (these are colors that are coded so that any website can recognize them).

If I've designed a banner for you previously, check with me and I can help you figure out codes. Otherwise, you can just click on close color matches from the color palette shown in the Fonts and Colors Tab. When I reference entering a hex code below, that's where you'd click on a color that you'd like used for each element.
  1. Log in to Blogger.
  2. Under Template, click on the Fonts and Colors Tab.
  3. Down the left side, there will be a box with a vertical scroll bar listing all the things that you can pick a color for. You'll need to change the color of the hex code for each item using the following code and entering it in the box to the right that is labeled as "Edit color hex code" with a # and a six digit code. You'll follow the same steps for each item (Main Background Color, Text Color, Link Color, etc.).
  4. Click and highlight Main Background Color. From your custom list of hex codes, copy the #______ code to match with each item on the list. Go to the box under Edit color hex code, double-click and highlight what's there and then paste in the new code copied from this email list. Scroll down through each item on the list of items and update the colors. After each time you enter the hex code, you need to hit the Enter key, and for what it's worth, when I used the Enter key on the number key pad, it didn't seem to work. You'll know it's taken the change if you see the sample color in the scroll list on the left change to what you were expecting. You'll still want to save using the Save Changes button, but without hitting Enter, it doesn't seem to "get it."

Good luck!

Wednesday, December 5, 2007

Making a watermark "brush" for use in Photoshop

These instructions are based on my version of Photoshop which is part of the CS3 package. This is my first attempt at instructions for Photoshop. If you need help with older versions, I have some experience and may be able to help if necessary, but I don't have access to an older version to reference while writing up instructions.
Making a watermark "brush" for photoshop:
  1. Open Photoshop.
  2. Open your dark watermark version.
  3. Click on the paintbrush tool so that it is active.
  4. Go to the menu at the top and choose "Edit." Scroll down to the option to "define brush preset."
  5. Edit the name of your brush if you'd like in the name option box that should pop up. Click ok.
  6. You should see an outline version of your watermark as you move the cursor around.
  7. Open a photo that you'd like to put your watermark on.
  8. In your color palette, pick a color that will look good over your photo (i.e., show up, but not overwhelm the image).
  9. With your brush still using the watermark shape, click on your photo, and save as a new version of your photo referencing that it's a watermarked version.
I hope this helps! Let me know if you have questions. :)

Adding your banner to your Blogger blog

To post your new blog banner to your Blogger blog:
  1. Save banner where you can find it on your computer.

  2. Login to Blogger.

  3. Under the Template tab, click on the Page Elements tab. Click on the Edit link.
  4. This will open a new window that should say "Configure Header" at the top of it.

  5. Within that window, where it says "Image" to the right of it, click on the button next to "From your computer:" and click on the Browse button. Navigate to your saved banner file and double-click on it. This will select your banner and it should show up in the Configure Header window as a small preview of the image.

  6. Click the button next to "Instead of title and Description."

  7. Click the orange "save changes" button.
If this doesn't make sense, or if you have questions, please send me an email (using the link in the menu on the side). For my customers, if for some reason your banner doesn't fit the template you've chosen, please email me and I'd be happy to resize your banner to fit without losing quality.